TB! Fibonacci Elliot Wave OscillatorOnly one way to do it the right way!
With forwarded wave propagation.
חפש סקריפטים עבור "WaveTrend"


Rational CCIThe Rational CCI uses a variety of mechanisms to signal potential long / short entries, both on the long and short time frames.
Bullish crosses (typically buys) are encountered when the CCI crosses the EMA, and is in the Bearish/Oversold territory. Typically, one should aim to go long when there is both a bullish cross, as well as bullish divergence (higher low on the indicator, with equal to lower price).
This indicator also works great for detecting valid FOMO buys vs. getting in when there is not much juice left to squeeze. When there is a strong bullish move encountered that does not have a bearish crossover immediately preceeding it, these are considered strong breakout/momentum buys.
Bearish crosses (typically exits/shorts) are encountered when the CCI crosses down under the EMA and is in the Bullish/Overbought territory. Similar with the long entries, one should aim to exit long, or enter in a short when there is both a bearish cross, as well as bearish divergence (lower high on the indicator, with equal to higher price).
Lastly, similar to highly bullish breakouts/momentum peaks, strong bearish momentum is detected when there is a strong bearish movement that does not have a strong bullish move and/or bullish cross immediately before it.
On higher resolution time frames, the trading strategy is nearly the same -- however as mentioned before, it works best when there is both a signal + divergence.
While effective buy itself, I highly recommend employing this indicator in conjunction with your other favorites. I find it to work best with GodMode, LazyBear WaveTrend, and Willy's%R. If anything, this is a great indicator to use as confirmation when other indicators may be contradicting one another.

Noro's SILA v1.6LIn 1.6:
1) WaveTrend Oscilator (LazyBear's code)
2) Locomotive-pattern
3) A new distance for SILA lines
Noro's SILA v1.6L - the original and new system of finding of a trend.
SILA is not one trend indicator, but 8 different trend indicators in one. Therefore high precision.
For:
- any pair
- any timeframe >= H1

Fractal Composites Ribbon (V2)Compresses 8 fractal oscillator timescales into a ribbon of up to 5 composite lines.
This is a smoother version of the original Fractal Composite with alerts on reversals in the overbought/oversold zones.
Fractal Composites normalize and 'cartoonize' the price chart to fit and bounce between statistically-defined overbought and oversold zones. Each lines resembles the shape of the price wave on a different time/size scale, with some distortion as the size of price movement fluctuates. Conceptually, reaching the overbought/oversold zone corresponds to price reaching a ribbon of Bollinger bands, though our 'band statistics' are much smoother and more mathematically sophisticated than standard Bollinger.
Because markets have similar fractal behavior across all timescales, this indicator applies to any timescale, from 1 minute to 1 hour or 1 day. You shouldn't really need to futz with the numerical parameters -- the most important choice is your chart timescale for how fast you want to trade. A faster timescale will show you more dotted reversals in the overbought/oversold zones to trade. The 'Show...' checkboxes let you choose how many composite lines, lag lines, and crosses to see. Information overload? Or a reminder that any single indicator embeds many assumptions about time and price scale in its signal...

Fractal Quad Components8 Fractal Resonance Component indicators on a chart eats up LOTS of vertical space, so we're providing this Fractal Quad Components script to group 4 components a bit more compactly (eliminating the margin whitespace between indicator rows).
To view 8 components you'll need to add a second instance of this script to your chart and set its Base Timescale Multiplier to 16. Then grab the dividers to stretch both instances to a good viewing height.
One disadvantage of this grouping method is that to read off the x2, x4, and x8 lead and lag line values, you'll need to mentally add 200, 400 or 600 respectively.
We also replaced the "Extreme" > +-100% black crosses (+) with more subtle purple circle outlines. These extreme crosses are often (but not always) too early to be a major reversal so it's best not to overemphasize them.
Significant crosses (> +-75%) are still highlighted with black circle outlines, and are the most likely to be major reversals for buy/sell.
Note how the 30-minute oscillator (2nd row) showed the cleanest (black-outlined) reversals on the S&P for the last week of 2016, with just a bit more profit-eating lag than the 15-minute oscillator above.

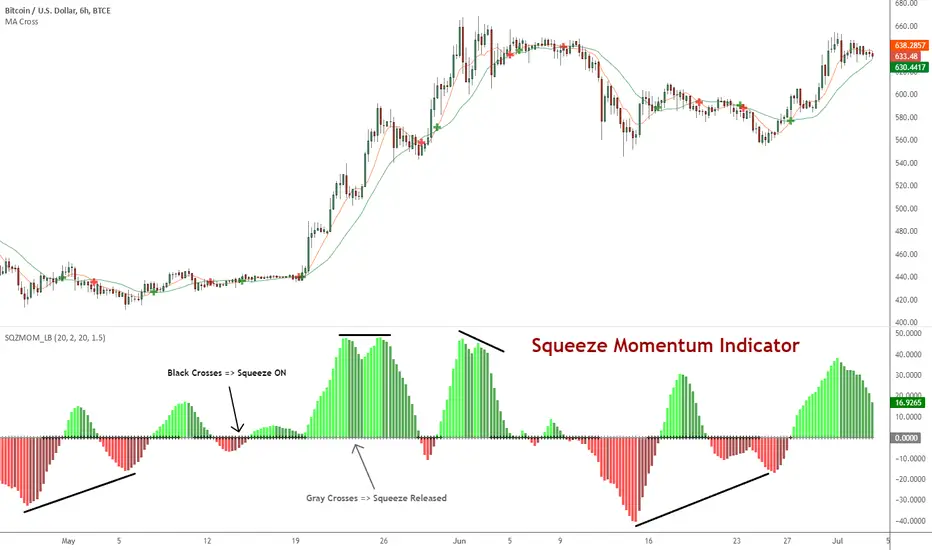
Squeeze Momentum Indicator [LazyBear]
Fixed a typo in the code where BB multiplier was stuck at 1.5. Thanks @ucsgears for bringing it to my notice.
Updated source: pastebin.com
Use the updated source instead of the what TV shows below.
This is a derivative of John Carter's "TTM Squeeze" volatility indicator, as discussed in his book "Mastering the Trade" (chapter 11).
Black crosses on the midline show that the market just entered a squeeze (Bollinger Bands are with in Keltner Channel). This signifies low volatility, market preparing itself for an explosive move (up or down). Gray crosses signify "Squeeze release".
Mr.Carter suggests waiting till the first gray after a black cross, and taking a position in the direction of the momentum (for ex., if momentum value is above zero, go long). Exit the position when the momentum changes (increase or decrease --- signified by a color change). My (limited) experience with this shows, an additional indicator like ADX / WaveTrend, is needed to not miss good entry points. Also, Mr.Carter uses simple momentum indicator, while I have used a different method (linreg based) to plot the histogram.
More info:
- Book: Mastering The Trade by John F Carter
List of all my indicators: